Today I ordered a Bradley 4 rack smoker from Amazon. I have a gift card to Bass Pro Shops (thanks Mom and Dad) so I a going to buy the large sampler pack of pucks there. Looking forward to lots of ribs, brisket and sausage.
Today I ordered a Bradley 4 rack smoker from Amazon. I have a gift card to Bass Pro Shops (thanks Mom and Dad) so I a going to buy the large sampler pack of pucks there. Looking forward to lots of ribs, brisket and sausage.
This is just a quick list of notes and links looking at cheap Chinese laser cutters and possible uses
Acrylic
Cardboard
Leather
Denim
Felt
MDF
Chipboard
Sugar
Rubber
Paper – books
Glass?
craft foam
Mirror (back)
rocks
sponges
beans
Vinyl – PVC
Kydex
ABS
Superhero masks
Catan
Stencils
Stickers?
Inlays
Comic prints
instrument panels
Plant tags
Stamps
Gloves
Holster
Topo Maps
Tokens
Records
cut pipes
name tags
license plate covers
https://www.ebay.com/itm/152532418116?ul_noapp=true
https://www.ebay.com/itm/Water-Break-Protection-40W-CO2-Laser-Engraver-Crafts-Cutter-w-Panel-Control/162448714948?hash=item25d2b2acc4:g:vWQAAOSwTM5Y2ysr
https://fslaser.com/Products/Lasers
http://en.voiernlaser.com/index.html
salewang@voiernlaser.com
https://lightburnsoftware.com
https://cncpro.yurl.ch/
http://svgnest.com/

Mmmm Burger
I have recently undertaken a journey of cooking*. What started out as complaining about the price of ground beef (ridiculous), has turned into an obsession over cooking the perfect burger. This is one of my better results. I’ll probably make a few more posts as time progresses about the equipment that I’m using, but suffice it to say that this was one delicious burger. Special thanks to my buddy Joe for the delicious homemade pickles.
*Despite a few more posts, I promise not to turn this into a foodie blog. If you like that sort of thing, check out A Hamburger Today, which I blame entirely for my obsession.
I pulled this Razr clone from next to the dumpster. It had a loose front wheel that required tightening one bolt to fix. After I got it working I took it out for a spin. Wow, am I bad at riding it. To avoid an inevitable and grisly crash I left it on the deck and ignored it for a few months.
After spending the winter in the snow the scooter had developed a nice layer of rust.
I decided to give it to a friend’s kid who didn’t have a scooter. When I looked at it I realized that there was way too much rust on it for any kid to want it. Time for some rust removal.
The firs step was to disassemble the scooter. I took pictures of each area so that I would be able to put it back together later, and so I could share the experience with you.
As you can see the rust even made it inside of the handles. I found it interesting that the caps were held on with a simple knot. That was good for me, it was easy to reassemble.
These ball bearings were the worst part of the project. There was one on top and one at the bottom of the fork. Both had loose bearings. I lost one through my deck, fortunately it didn’t seem to effect the performance. I had to look back at this picture twice to get it back in right.
Here are all the parts disassembled and ready to be cleaned. Apart from removing rust I wanted to take off all of the cheesy stickers. They were beat up and proof that it was a generic scooter, not good things when you are a kid.
Here are all of the small parts soaking in a bath of acetone. This did a fairly good job of cleaning off all of the dirt and grease. I used an old toothbrush to give each piece a good scrubbing.
To be continued in another exciting episode…
Dun, dun duuuuuuun.
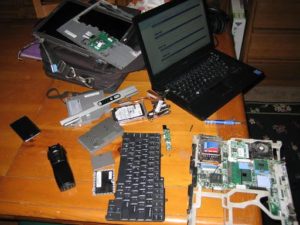
You have to remove almost everything to get to the power connector, which is what almost always fails.
This is what happens when you send your laptop home with me to fix it.
Things break. Sometimes it is sad. Sometimes it is beautiful. This is one of the latter times. In this particular case it is a 500 Watt theatrical lamp that burned out. I like how the filament melted into the quartz before it vaporized.
I was walking around the downtown area of a small town and I found this posted on the door of a store. Hit the More link for a cleaned up version.
Absorbed by grass, a chair finds new life as a sort of unnoticed statue in a junk yard of abandoned things. Oh how I love old stuff…
When I was doing my CFL Teardown I mentioned that I thought the PCB would make a cool keychain. It does. I have had it on my keys for a little while now and it works quite well at helping me find my keys without getting in the way. I like the side with the components silkscreened on, most people like the green side with the traces.
To make it work as a keychain I had to widen out one of the holes to fit the key ring through. There are a ton of ways to do this, but I happened to have my Yankee Drill sitting on my counter as I was working, so I used that. Next I wanted to take off the excess solder so all the holes would be visible. I was feeling lazy so instead of using a solder sucker I just used solder wick. Once I was happy with the amount of solder I had left I put the keychain in my toaster oven to round off any sharp bits of solder that were left over. This made the board a bit discolored, but it also kept me from cutting myself when pulling my keys from my pocket.
After a few weeks using it the only problem I see is that I am slowly wearing the hole larger. I figure that in a few months I will wear completely through. I could cover the whole thing in a clear epoxy and it would probably last much longer. Probably I will just take apart another broken CFL and use the PCB again.
This is going to be an ongoing project for a while. I believe that it is a 1975 Yamaha motorcycle. I don’t really know many other details yet, hopefully I’ll get someone much more knowledgeable than myself to take a look at it soon. Hit the read more link for more pics and a little more info about the bike.
I went to visit my younger brother this weekend, and he had this yellow bike in his garage. It was left behind by the previous owners and he didn’t have a use for it. Not to mention that it was very broken and dirty.So I threw it in the back of my car (with the help of my lovely wife), tied down the trunk with some rope and drove it back to my place.
It is going to need a lot of work. Almost all of the electrical is unhooked and there is no battery.
The seat cover was all missing but the little bit that said Yamaha on the back. The seat was soaked in dirty oil. The gas tank isn’t connected to anything. The chain, brake cables and throttle are all missing.
But, when I pushed on the started the engine turned over. Yes it may yet work
This is the label, or at least most of it. The top has the numbers 3/75 on it so I’m guessing that is “THE DATE OF MANUFACTURE shoWN ABOVE” If anyone has any info or tips as I dive into this project I’d love to hear from you.