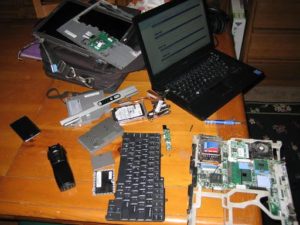
You have to remove almost everything to get to the power connector, which is what almost always fails.
This is what happens when you send your laptop home with me to fix it.

You have to remove almost everything to get to the power connector, which is what almost always fails.
This is what happens when you send your laptop home with me to fix it.
This is going to be an ongoing project for a while. I believe that it is a 1975 Yamaha motorcycle. I don’t really know many other details yet, hopefully I’ll get someone much more knowledgeable than myself to take a look at it soon. Hit the read more link for more pics and a little more info about the bike.
I went to visit my younger brother this weekend, and he had this yellow bike in his garage. It was left behind by the previous owners and he didn’t have a use for it. Not to mention that it was very broken and dirty.So I threw it in the back of my car (with the help of my lovely wife), tied down the trunk with some rope and drove it back to my place.
It is going to need a lot of work. Almost all of the electrical is unhooked and there is no battery.
The seat cover was all missing but the little bit that said Yamaha on the back. The seat was soaked in dirty oil. The gas tank isn’t connected to anything. The chain, brake cables and throttle are all missing.
But, when I pushed on the started the engine turned over. Yes it may yet work
This is the label, or at least most of it. The top has the numbers 3/75 on it so I’m guessing that is “THE DATE OF MANUFACTURE shoWN ABOVE” If anyone has any info or tips as I dive into this project I’d love to hear from you.
My Dremel burned out recently when I was using it. I was cutting through some thin aluminum with a grinding wheel when it got hot, then stopped working altogether. I received the Dremel as a gift for my wedding and didn’t have a receipt for it. I called up Dremel and they had me send it in without giving me any trouble. A short while later I got a box from UPS. Not only did it contain a perfectly working replacement unit, it had a nice letter, a CD of project ideas and a free accesory. Thank you Dremel very much. I think I may need to go buy some more Dremel products.The accesory was a 120 grit flapwheel sander. I’m not sure what I’m going to do with it, but right now just about everything is looking like it could use a good sanding.
In case you are wondering how I finished my project after the original dremel died, the metal was thin enough that I was able to cut through it with a box cutter. You’ll see that project in a later post.
One of my compact fluorescent lights stopped working recently. Instead of throwing it away I decided to crack it open and see what was inside.
<warning> Electricity can hurt you. If you don’t know what you are doing, get someone who does to help. </warning>The first step was to remove the metal base and pry the plastic off of the globe. The plastic base, globe and lamp were disposed of. Be careful with the lamp, it contains mercury vapor, not something you want to be breathing.
The main circuit board. Everything was pretty tightly packed in. At first glance nothing is obviously bad. The plastic on the enclosure was a little browned, so I’m guessing something overheated. One part of the large yellow inductor was cracked when I removed it, so that is a possibility.After a little time with the soldering iron I’ve got a nice pile of parts. I got six diodes, seven capacitors (two matching), five resistors (two matching), three inductors, two matching transistors, a fuse and a nifty circular pcb. Normally I would dispose of the pcb but I think it would make a really cool looking key chain.
Now all I need to do is check the parts that might be bad and put them away in my parts drawer.